Carlson, trees and me

Well I really do need to stop saying I'm "back in business", because no sooner do I say it then something goes awry. Mid-way into the James River studio piece I posted about in my last blog, Ma Nature delivered to us a belated white Christmas and sub-freezing temperatures. School closed for three days (!) but in fits and starts I got 'er done.

"Take Me to the River", Oil on linen, 24x30: ©Jennifer E Young

"Take Me to the River", Oil on linen, 24x30: ©Jennifer E Young

There's quite an investment in paint in this piece, but since I was able to work at least a little bit on it each day over our surprise break, it stayed open and wet enough that I was able to work up a nice texture without the dreaded gumming up of paint that can lead to over-work. 

Lately I've been looking at and thinking a lot about one of my painting heroes, John F. Carlson. If you paint landscapes (or are the connoisseur of them), you may already know about his well-loved book "Carlson's Guide to Landscape Painting". If you haven't heard of it, I highly recommend picking up a copy if you are serious about the study of painting in this genre.

Carlson was a Swedish-American Impressionist born in 1875. His family immigrated to New York in 1884. Carlson went on to study art at the Art Students League in New York City, and achieve a fine career as a landscape painter, with prestigious exhibitions and a position as the director of the Woodstock School of Landscape Painting.

While he painted a variety of subjects, he made many powerful works based on scenes containing primarily groupings of trees. Carlson really was a master of form and negative space. The simplicity of his subject matter in many of his better-known paintings belied the abstract power of his compositions.

So in addition to thinking about light and shadow, variations in color, etc., I thought a lot about variation in shapes, both negative and positive. The James River series really does lend itself to this kind of study, as many paths to the river are wooded before you arrive at its rocky banks. Twisted roots along the forest floor add an additional element of interest to the composition. I had such a good time with this painting that I am developing a companion. More about that coming soon.

Varenna mini gouache study

Thought I'd do a little experimenting with this fun little 5x6" study in gouache.

"Colors of Varenna (study) Gouache on Cottonwood Arts Coldpress paper, 5x6" ©Jennifer Young

"Colors of Varenna (study) Gouache on Cottonwood Arts Coldpress paper, 5x6" ©Jennifer Young

Here I'm just trying to get an idea about my lights and shadows and the basic shapes, so I've not much detail. For this composition I experimented with using a compositional grid that we studied during Kevin Macpherson's workshop (you can probably make out some of it in pencil beneath the gouache. I mentioned it briefly in my last post, but basically this is a method to achieve an informal subdivision of space, as discussed in Andrew Loomis' book called Creative Illustration:

loomisgoldensection
loomisgoldensection

After I learned more about this "grid thing", I realized that I had often been using this kind of subdivision intuitively. But it is good to have a tool handy to be more deliberate about it when one wants to, or if you are dealing with a complicated subject and are trying to decide what to leave in, what to edit out, and how to arrange a painting for the most pleasing effects.

It's been a while since I have worked with gouache and had forgotten that the colors shift a bit when they dry. Nevertheless I had a good time and really look forward to working with them again.

Lake Como W.I.P. & Demo

I mentioned in my last post that I had a new painting in the works, and I thought I'd attempt a little demo with this one. I say "attempt" because my laptop finally gave up the ghost, and these days I tend to do a lot of my writing via my mobile. Not only am I "all thumbs" (literally) but I have to sneak it in before my phone gets snatched away by the chubby little hands of my daughter who wants to "see pictures" whenever she sees it emerge from my pocket. This will be a painting of the beautiful fishing village of Pescallo. Pescallo is a tiny, sleepylittle place that sits just down the slope from Bellagio (also very beautiful). In fact, I could see Pescallo from the balcony of my Bellagio hotel, and the drama of the light as it poured over the mountains and harbor beckoned me to take a stroll down there many mornings before we started the day's touring.

I begin by sketching out a compositional plan that is also a value plan for the painting. I do this using light, middle, and dark value gray oil paints in my sketchbook. I often do a similar thing with Tombo pens (the grayscale ones), but mostly when I am painting outdoors as a way to quickly hone in and get a handle on my composition (in an environment that is bombarded with stimuli). But it is a good practice with studio work too. The oils are mentioned in Kevin Macpherson's book, "Landscape Painting Inside and Out," and I have long wanted to buy these paints so I could give it a try. They are Portland Gray Light, Medium, and Deep, by Gamblin. Hey, if it's good enough for "KMac", (as my husband calls him) it's good enough for me!

notan sketch
notan sketch

The point of this is to see if your painting has a strong underlying structure with a unifying value plan without getting bogged down in details. This is really supposed to be more of a notan sketch at this stage, which is a very simplified thing and addresses more of the armature of the painting rather than the pinpoint accuracy of objects and shapes. It's been a while since I've done this kind of study, and I realized at some point that I had not allowed much for the fourth value I was working with, which was the white of the paper. Oops! So I had to amend my sketch a little and add in some white for the lightest areas.

Still, I feel that my plan is solid and I'm ready to move forward by sketching out a line drawing on my 24x30" canvas.

oil sketch lake como painting by Jennifer Young

For this I am using burnt sienna (Winsor Newton), thinned with Gamsol mineral spirits. I don't much use this earth color in the rest of my painting stages, and while I could mix up  a good earth for such a job using my standard red, yellow, and blue, it is more of a convenience for me to use a premixed paint at this preliminary stage. I also like it because it lends a nice warm undertone to the canvas as I go along, and it doesn't bleed into my other colors (especially the light ones like the sky) when I move beyond the sketching stage.

Now that I have a plan, I am ready to start painting with color! I'll get into that in the next post .

French pastoral WIP and art studio WIP, cont'd

The misty painting of the Lot Valley continues....

Lot valley france landscape painting

Still trying to keep things soft, but articulate them at the same time. Today I'm working on the sheep. Meanwhile, I've been told that it's okay to continue my obsessive postings about the new studio ;-) . So here's a little mini tour:

First of all, so much of the furniture in this space came from IKEA that you'd think I had an interest in the company or something (none exists--other than a serious interest in shopping there. ) In fact, we put so many of my "IKEA finds" together that Dave started calling it "I killya" because of how much this stuff weighs. Still, there's no denying that they have some intelligent designs to outfit an office and art studio (and the price is right too!)

Here's a view of my painting area and the sink. At first I was going to go with a regular utility sink and cabinet, until I found the "Udden" sink at IKEA.

artist's studio jennifer young

That sink nearly DID kill us, actually--trying to lift the coordinating cabinet up to screw it into position in it's nifty little slot. For a while after that little ordeal I seriously thought I had nerve damage in my hand (my "painting hand, too!)

Below is a view from my little sitting/library area looking toward the art bins that Dave built for me. There are some more bins on top temporarily, but they will go up in the loft area when we're finished with them. At this writing, we're still working on studio storage, so I'll write more on that in a future post. A bookcase blocks the view, but the sink sits across from the bins, and my main easel stands across from the full-length mirror pictured, so I can check my work in reverese.

artist's studio jennifer young

And now flipping my position, here is a view of my sitting/reading area from beside my art bins (still populating the shelves with my many art books!)

artist's studio jennifer young

I have divided my sitting and office area from the painting/sink area with a large 6 foot room divider with storage cubbies from IKEA's Expedit storage series. I like that it divides the space while still giving me a feeling of openness. What is hard to see is that I've bolted this unit at a right angle to a white bookcase that faces the French doors for added function and stability.

The ladder is actually an old telephone ladder like this one that I bought cheap on Craigslist. We're still working to make it a moving ladder on a track...almost there.

Now we're on the other side of the room divider looking at my table where I do my framing, plein air panel prep, and flat art-mounting. All those little drawers are great for my framing tools and fasteners.

artist's studio jennifer young

In this same "room" sits my office. Can you tell how much I like paperwork? I've rather been avoiding going through my files, but since it's tax season, it's the task before me:

art studio jennifer young

Note those big squares of light from the windows and how far they come into the room. This is why I opted not to have east-facing windows also on my painting side. I will likely put up some kind of sheer window treatment soon to diffuse this light so it won't be so harsh.

Conspicuously absent from these pictures are my paintings that will in future be on the walls and in the bins. We have yet to get them out of my temporary storage space until we have finalized our art storage solutions....but more on that in a future post.

Annapolis Day 2- A fine morning with guidance from Gruppe

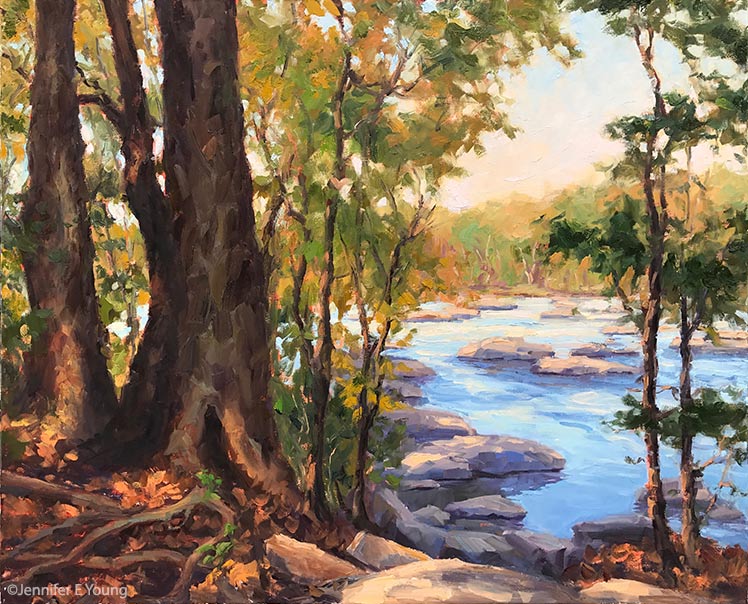
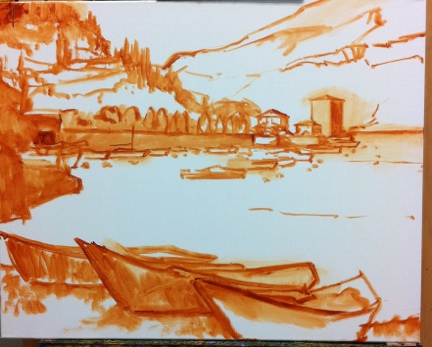
Had a few technical difficulties to overcome before I could post again, but I'm picking up where I last left off writing about the Annapolis paint out. Day two of the paint-out started off great, mainly because I had been able to do a little planning the day before. Painting in an unfamiliar place can always be a little overwhelming. It takes a little bit of time to get your bearings and find locations that appeal to you. This task can also be a little more daunting if you are also painting unfamiliar subject matter. (In my case, not living near a harbor or having much boating experience,  that subject matter would be the preponderance of boats.) To tackle the first obstacle, I spent some time on the first day (in between my morning and afternoon paintings) just wandering around scouting out possible painting locations along the many small harbors. One thing to consider is the path the sun will take across the sky throughout the day from sunrise to sunset. Having already done one morning painting the first day, I began to get a feel for which locations would make good morning setups and which would work better for me in the evenings. (I will also sometimes carry a compass with me to accomplish this task.)  As a result, I found a location in Eastport that I knew would be perfect for an early morning sunrise scene. And in contrast to the first morning when I got started late, I was able to arrive early on day 2 and start painting between 7 and 7:30 a.m.

As for the second obstacle.... the first thing I had to do was to recognize that no matter what I am painting, all I really need to do is paint shapes and the play of light on forms. If you can accurately see what is in front of you as abstract shapes and light patterns (and get a good grasp especially on painting the shapes of the negative space between the forms as well,) form naturally happens. Having said that, the mind plays tricks on the untrained eye--even sometimes on the eye that has had a bit of training. Boats (like trees and the human face) are some of the things that the mind has long tended to see as symbols. They're some of the things that so many of us drew when we were kids --a sort of half-circle topped with two triangles. So one can easily fall into the trap of painting a symbol of a boat (or a tree or a face) instead of painting the actual shape.

While intellectually I know that all of the above is true, for my own peace of mind, I found it also helpful to consult one of my favorite art books of all time by Emile A. Gruppe. Gruppe was a fine New England painter of landscapes, townscapes and most notably to me, marinescapes . He was active in the 30's on up until the 70's and received training at the Art Students League in New York, and from famed American landscape painters Charles Hawthorne and John F. Carlson. Gruppe was also a wonderful teacher in his own right, both through the school that he established, and through his series of books on painting ("Brushwork," "Gruppe on Color" and "Gruppe on Painting; Direct Techniques in Oil" ). 

All three of these books are fabulous. They are also out of print, making the ones that are still available quite pricey and difficult to acquire. I haven't written much about these books before because there is just sooo much I would want to to say. I can't give proper honor to each of them now without making this post even longer than it already is, but suffice it to say that despite the cost and the regardless of sad quality of the painting reproductions within, they are three incredibly worthwhile and inspiring (if not essential) additions to any landscape painter's library.

For my money, Gruppe was a master of brushwork and composition. Living in New England, he was also a frequent painter of harbors and coastal scenes, which made his book, "Gruppe on Painting; Direct Techniques in Oil," a perfect traveling companion on my trip to Annapolis. I'm glad I grabbed it as I was walking out the door, especially since this particular book has a whole section on painting harbor scenes.  This is not a book of formulas, but rather a thoughtful book with a wealth of things to consider. For instance, here is an excerpt on drawing boats:

"...students havepreconceptions about what a boat should look like. They think of boats they drew as children, boats that were shaped like wooden shoes or bananas, curling up at the bow and stern. And that's how they draw them. But probably no shape could be less like that of a real ocean-going dragger; all those concave lines suggest weakness while the character of the dragger is strong and tough......Remember that the gunwhale of the boat is straight as it nears the bow--it doesn't sweep up like a gondola! And the bow goes into the water in a fairly straight line--it doesn't cut under sharply. Use strong lines to suggest a strong subject."

Just that one snippet helped me immensely, and yet there is so much more in this section alone; on cast shadows, masts, rigging, refraction, smaller boats, and docks and wharves. The conversational tone and the passion in Gruppe's writing helped me to internalize his teachings and carry them with me as I addressed the subjects and painted them from life. Here, finally, is the painting that resulted. I may need to touch it up when I return to the studio, but I was pretty happy about it overall:

coastal marine plein air painting annapolis

"Daybreak in Annapolis Oil on Multimedia Artboard, 11x14" (SOLD) ©Jennifer Young

On this second day of painting, I was happy to meet more of the artist members of the MAPAPA, so I felt a little more connected and a little less lost. In fact, as I was finishing up the above piece, an artist came up to me with a rather dazed and confused look. She said it was her first day at the paint-out, and she'd been driving around for an hour trying to decide what to paint. I had to chuckle (not at her, but with her.) Been there, done that!