Happy Thanksgiving! Plus, a little studio tour!

On this eve before Thanksgiving, I feel extremely grateful for the blessings of both my personal and professional life.  To my collectors, past students, and readers of my blog and newsletters, I give my heartfelt thanks. Knowing that people have taken such an interest in my art (and my meandering thoughts about it) does my heart more good than I can adequately express! Happy Thanksgiving to you all! One of the many other things I've been extremely grateful for professionally these past few years, is my studio. Since I just cleaned it up, I thought it might be nice to show some pictures of how it looks today (now that I have had about 5 years to break it in.)

The last time I posted pictures of my studio, I had only barely moved in. But, while it may have  a little bit more clutter now than it did initially, it is still a "clean, well-lighted space".  It continues to be a place of inspiration for me,  and now for my little daughter as well. And since I've become a mom, I have thanked my lucky stars these last few years that I have my studio within a stone's throw of my back door. Sometimes the only time I have to paint is in the wee hours, so proximity has been key.

Any way, without further ado, on with the tour!

This first shot is more or less the view straight on as I walk in my side door (the main entry door for me as it leads to the house.) Following this path leads me straight back to my painting space, which sits across from that big brown easy chair and the French doors beyond (just out of view to the right). In that far back corner are storage bins (built by the D.H.) for frames and canvas.

Jennifer Young Studio & Gallery

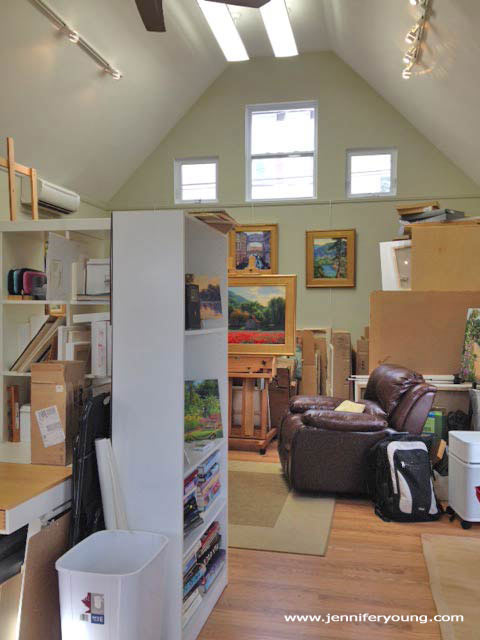
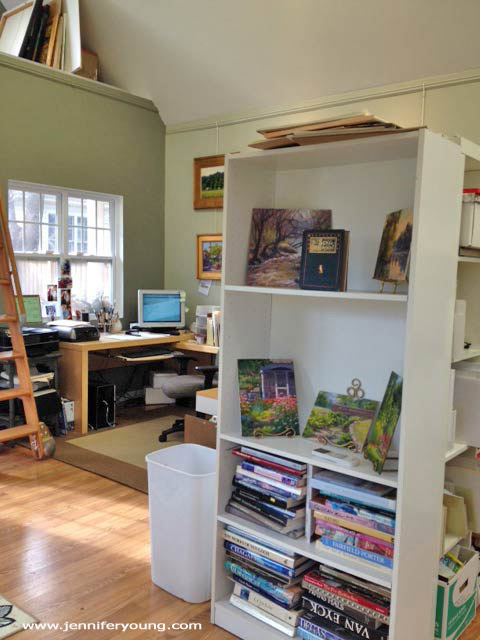
From this spot, looking slightly to the left, you will see the framing table and flat files. That table from Ikea, as well the room divider, hold all of my framing tools and shipping supplies, small canvas and panels, etc. I got the flat files for a song at a thrift store. Luckily it just so happened they fit under the table nearly perfectly.

jystudio_framingtable

Directly across from the framing table is my computer desk. I also have more storage for frames, shipping tubes, bubble wrap, etc., in the loft area overhead. Nothing too heavy goes up there, as the only access is by that very tall loft ladder!

Art studio of Jennifer E. Young

Here's another shot of the loft, as well as the "side door" that I use to enter. To the left of this area I have carved out a reading nook. This area has kind of become a little annex for my daughter's arts and crafts, but I still can use it for guest seating when I need to.

Art studio of Jennifer E. Young
art studio of Jennifer E. Young

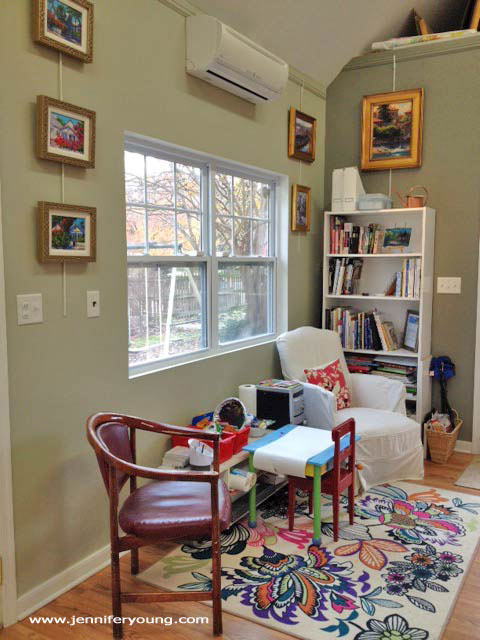
Moving past the room divider now, we come to my painting area. Being my primary workspace, this side of the studio is a little more about form following function. ;-) The sink sits in the far left corner. The "mini-split" we installed for heating and cooling sits on the wall nearby. It  keeps things nice and comfy. I have another one over the windows of my reading nook. In hindsight I really think I could have gotten away with just one of these units in this space. They are very efficient!

art studio of Jennifer E. Young

So there you have it! The nickel tour. Again, Happy Thanksgiving, everyone. I'll be out of pocket for the holiday, but back to posting again by this weekend  Eat well and safe travels!

Caring for oil paintings- some tips!

I recently received some questions from a new collector on how to care for her oil painting, so while I have discussed these issues here on my blog before, I thought my readers might also find a refresher helpful . I personally feel that oil paintings are much easier to care for than works on paper, but there are some guidelines to follow to ensure your painting receives a long and happy life.

I frame all of my oils without glass, as a canvas painted with oils that has adequately and properly cured is quite a bit less delicate than works on paper, which are more prone to deterioration when exposed to the environment. Framing without glass is indeed, just one of the great advantages of oil paintings, as it eliminates the glare that can be created by the glass covering. If you feel, however, that the paintings would be subject to any unusual conditions, consult a professional picture framer (or better still an art conservator), as they are best suited to advise you on such matters and may indeed determine that framing under glass is best due to those conditions. If you do use glass for any reason, the framer should use spacers between the painting and the glass, so as to avoid having the painting surface in direct contact with the glass (which can be highly acidic.)

When transporting the canvases, they should be held by the edges, not carried by tucking your fingers under and between the wood frame and the canvas. Do not lean anything up directly against a canvas or allow the canvas itself to lean or touch another object as this may cause the painting to develop “dimples” or indentations. Avoid hanging the paintings in direct sunlight. I do use professional grade archival paints and canvases, but any artwork, no matter the medium, will be prone to fading if in direct sunlight for a prolonged period of time. Also avoid high moisture areas (like steam from a hot tub or a bathroom shower, for instance)  which can cause the canvas to expand and contract and the frame to warp, creating the potential for cracking of the paint surface. Really though, the greatest risk to a painting occurs during transport, so assuming it is properly packed and arrives in good shape, the rest of its care should be pretty easy and straight forward.

French pastoral WIP and art studio WIP, cont'd

The misty painting of the Lot Valley continues....

Lot valley france landscape painting

Still trying to keep things soft, but articulate them at the same time. Today I'm working on the sheep. Meanwhile, I've been told that it's okay to continue my obsessive postings about the new studio ;-) . So here's a little mini tour:

First of all, so much of the furniture in this space came from IKEA that you'd think I had an interest in the company or something (none exists--other than a serious interest in shopping there. ) In fact, we put so many of my "IKEA finds" together that Dave started calling it "I killya" because of how much this stuff weighs. Still, there's no denying that they have some intelligent designs to outfit an office and art studio (and the price is right too!)

Here's a view of my painting area and the sink. At first I was going to go with a regular utility sink and cabinet, until I found the "Udden" sink at IKEA.

artist's studio jennifer young

That sink nearly DID kill us, actually--trying to lift the coordinating cabinet up to screw it into position in it's nifty little slot. For a while after that little ordeal I seriously thought I had nerve damage in my hand (my "painting hand, too!)

Below is a view from my little sitting/library area looking toward the art bins that Dave built for me. There are some more bins on top temporarily, but they will go up in the loft area when we're finished with them. At this writing, we're still working on studio storage, so I'll write more on that in a future post. A bookcase blocks the view, but the sink sits across from the bins, and my main easel stands across from the full-length mirror pictured, so I can check my work in reverese.

artist's studio jennifer young

And now flipping my position, here is a view of my sitting/reading area from beside my art bins (still populating the shelves with my many art books!)

artist's studio jennifer young

I have divided my sitting and office area from the painting/sink area with a large 6 foot room divider with storage cubbies from IKEA's Expedit storage series. I like that it divides the space while still giving me a feeling of openness. What is hard to see is that I've bolted this unit at a right angle to a white bookcase that faces the French doors for added function and stability.

The ladder is actually an old telephone ladder like this one that I bought cheap on Craigslist. We're still working to make it a moving ladder on a track...almost there.

Now we're on the other side of the room divider looking at my table where I do my framing, plein air panel prep, and flat art-mounting. All those little drawers are great for my framing tools and fasteners.

artist's studio jennifer young

In this same "room" sits my office. Can you tell how much I like paperwork? I've rather been avoiding going through my files, but since it's tax season, it's the task before me:

art studio jennifer young

Note those big squares of light from the windows and how far they come into the room. This is why I opted not to have east-facing windows also on my painting side. I will likely put up some kind of sheer window treatment soon to diffuse this light so it won't be so harsh.

Conspicuously absent from these pictures are my paintings that will in future be on the walls and in the bins. We have yet to get them out of my temporary storage space until we have finalized our art storage solutions....but more on that in a future post.

Studio building project- the final stretch

My online presence has been a little quiet lately because we are getting down to the "finishing touches" of prepping my new art studio for move-in. After my lights were installed, I finally came to a decision about the color of the walls, and I've spent the majority of my time in the last couple of weeks painting the walls and trim, installing picture moulding, painting more trim, and touching up walls and trim some more.  (Just one more door to go!) Not only am I body-weary, but I am also decision-making weary. So it is a good thing that most of the big decisions are now behind us. I really had a time trying to decide on wall color. I knew I wanted a color (as opposed to white/off-white). But having had yellow walls in my last studio, (great color for the gallery walls, not great for art-making) I also knew I wanted something that was neutral enough so as not to cast the wall color onto my paintings and palette.

While the color that's so popular right now with many portrait painters (mentioned in this previous blog post) was waaay too dark for my taste, I did like the idea of a neutral gray/green. So I decided to start my quest by playing with a sample of the portrait painters' color (Benjamin Moore's "Mohegan Sage", #2138-30) to see if I could figure out the underlying base color by tinting it with a bit of white.

It may look a little more "colorful" on the computer monitor, but the lightest tint was a fairly dead-looking gray. Benjamin Moore lists Mohegan Sage as a "black", and having tinted it I can see why. It probably is a combination of black with just a touch of yellow. It's very rich in its full strength, but none too inspiring in my tinting experiment! Still, tinting up to an almost elephant gray, I couldn't deny that it is a very neutral color, and thought I could use my tinted sample against some other color swatches to find a related color that was both lighter and more inspiring but still neutral for my studio walls.

What I found was a beautiful rich color that seemed to be in line with the darker sage, though perhaps a tiny bit cooler. It's a color called "Storm Cloud Gray" (also by Benjamin Moore, # 2140-40.)

art studio building wall color

While this color is a good deal lighter than the dark sage, I was still a little concerned that it would be too dark. So I decided to use it on just one wall as an accent and do the rest of the walls in an even lighter shade that I also liked-- again a gray green called "Paris Rain," (BM color #1501). Here is the result:

art studio wall color Jennifer Young

Here are the lighter walls running into the deeper accent wall, complete with sleepy husband reporting for cleanup duty last Saturday morning (what a guy!)

art studio wall color Jennifer YOung

I find both of these colors really lovely and pleasing. Sometimes they look more gray, sometimes more green; though in either instance they still remain neutral enough not to overpower.

In the above picture you can also see the picture moulding we installed so that I can hang artwork. Unlike the trim moulding, I decided to paint the picture rail the same color as the walls, both because I wanted to keep the high walls looking "high" and because the picture moulding was fairly plain and nothing special.

Since Dave (and friends) installed both the floors and the trim moulding, I wanted to do all of the painting myself to give the poor man a break. I totally underestimated how much time it would take. I guess it was those high walls that fooled me, but at last it's more or less done and we've had the "SmartBox" delivered (portable storage box). Over the next few we can actually start the process of moving in, assembling furniture, and piecing together my various work stations. This too will take a while (and likely a few more trips to IKEA) but it's actually starting to feel like a real art studio now. I'm excited about the prospect of being in there and getting back to painting again (as in ART) on a regular basis!

The next big challenge will be figuring out some storage solutions that make sense for the new space. Much of that will have to be dealt with after I've gotten my main workstations set up, but I will be sure to blog about it as I go along. Meanwhile, I doubt I'll do much blogging over the next few days, as we will be moving and dismantling my office for a bit.

An ideal art studio?

So all of this moving stuff has gotten me working on new studio plans, and I have certain things that I know I want for my next space. Namely these are: lots of storage, lots of light, good ventilation, and enough room to step back and forth while I'm painting. In the book Organizing From The Inside Out by Julie Morgenstern, the author suggests setting up whatever area you're organizing in "stations" by the kinds of activities you do. The Setup

  • A painting station, comprised of:
    • Easel, palette, monitor, large mirror (set up across from the easel to check my work).
    • Additional items: Optional secondary easel for a larger wet painting or WIP, bins or shelves for my paints and supplies, a drying station - preferably a "drying wall" for larger works in progress, and/or some shelving to prop up wet panels after plein air painting.
    • A flat work, framing & shipping station (There are several different activities here, but for all of them I use a table with lots of drawersfrom IKEA and shelving to store supplies, organized by activity.)
      • Picture framing, matting, and mounting artwork
      • Surface, panel and canvas preparations
      • Packaging/shipping
      • Work surface for watercolors, sketching, printmaking, etc.
      • Cleanup- Utility sink, shelves, paper towels, etc.
      • Office (computer stuff, desk, files)
      • Previously mentioned in the above notations, but bears empahsizing: Storage (of all kinds- shelves & bins for canvases, frames, books, etc.) and as much wall space as possible.

Optional but desired:

  • A sitting/viewing area- for reading and assessing my work
  • High ceilings (in a smaller space it can provide a more "open" feeling")

I don't ask for much, do I? ;-)

Into the light

Of all of the concerns, good natural lighting is among the biggest wants for me, because for one, working with inadequate light is hard on the eyes, and in my current work space it has been less than adequate. But you have to be careful because if there's too much of it shining directly on your canvas;  it causes glare problems with oils.

Artists always talk about north light as being the best for the most consistent, even and balanced natural light in the studio.  But a north-facing studio isn't always possible (my northern light is indirect at best because it's blocked by the building across the alley from us.) And any natural lighting will still need to be supplemented by artificial light, for overcast days and evenings when I may need to work, and for this I've found a few options.

Full spectrum lighting mimicks daylight, and it's what I currently use in my studio work area. I have this long flourescent bulb by Ott-Lite installed in a regular shop light that hangs just above and slightly behind me in my painting area. It does a pretty good job on my work space, but I still feel the need to supplement with additional lamps.

The reason full-spectrum is recommended is that it is more "neutral" than the yellow cast that is often put off by incandescent bulbs. Artist Nita Leland has a good article explaining this further, so if you're an artist you may wish to check it out.

In addition to the above-mentioned option, we're looking into some kind of solar tube lighting. Friends of ours have these installed in their home, and it's amazing how much light it can put out. I light this option better than a skylight for my painting area, as a skylight can cause a more spotlight effect and the solar tube is less directional and more all-over and diffused.

One other option I hope to incorporate is clerestory windows. If I can get ones that open, they can serve number of purposes;  indirect natural light, additional ventilation, and the preservation of precious wall space in the painting area.

What's your ideal studio?

If you're still awake and reading all of this, I'd love to hear your thoughts. Anything I've missed? What's your ideal studio? And while you're mulling that over, check out talented artist Casey Child's blog - in particular his chronicles of the fabulous new (huge) garage/studio in progress- northern lit and all. His early posts on the topic have some great inspiration pictures too. I bookmarked his site some time ago, and in fact, his research is so exhaustive that I might not have bothered with a post of my own. But I'm nearly finished, so I might as well hit the publish button now!