Lake Como Painting Progression (continued)

Well the time has really gotten away from me this week, as we are in the home stretch of my daughter’s “learn from home” work for her last weeks of fourth grade. But I HAVE been making progress on my painting of Varenna, the start of which I shared in my prior post.

First things first… I thought before going any further I would share a little about the colors currently on my palette, and what I’ve been using to work on this piece.

palette2.jpg

I will start by saying that this is a pretty big palette of colors for me, and definitely larger than what I use for my field work. But because I have such limited studio time, it helps to have a few more “convenience colors” to work with so I don’t spend so much time mixing. Plus look at those yummy colors. Sometimes it is just plain fun to indulge in them, as long as I don’t have to carry them around in my backpack! The paints listed with an asterisk* by their name are the kinds of colors I nearly always use. This is basically a double primary palette with the addition of an earth (brown pink) and a “black” (Payne’s Gray, which is really almost a dark blue).

I pretty much always lay my basic palette out the same way in a clockwise fashion. So for instance, starting with my earth colors in the lower left, I move up to white, which is always in my upper left, followed by colors from warm to cool, generally speaking. This palette has varied over time with a few colors added, or removed, or others substituted from time to time when I want to experiment. For instance, my two reds used to be Cadmium Red Light and Alizarin Crimson, but I switched to a cooler Napthol Red for my “warm” because when tinted it makes a cleaner, less orangey pink. I will use Quniacridone Violet in a similar manner to my former Alizarin Crimson for nice dark purples or browns, to modify other colors.

If you are new to painting I would recommend starting out with a double primary palette (a warm and cool of each primary color, yellow, red, and blue) plus white, and then slowly adding new colors over time as you get a good handle of what your primaries can mix. You might be surprised at what even a single primary palette can do.

Okay, enough palette talk for now. Let’s recap;

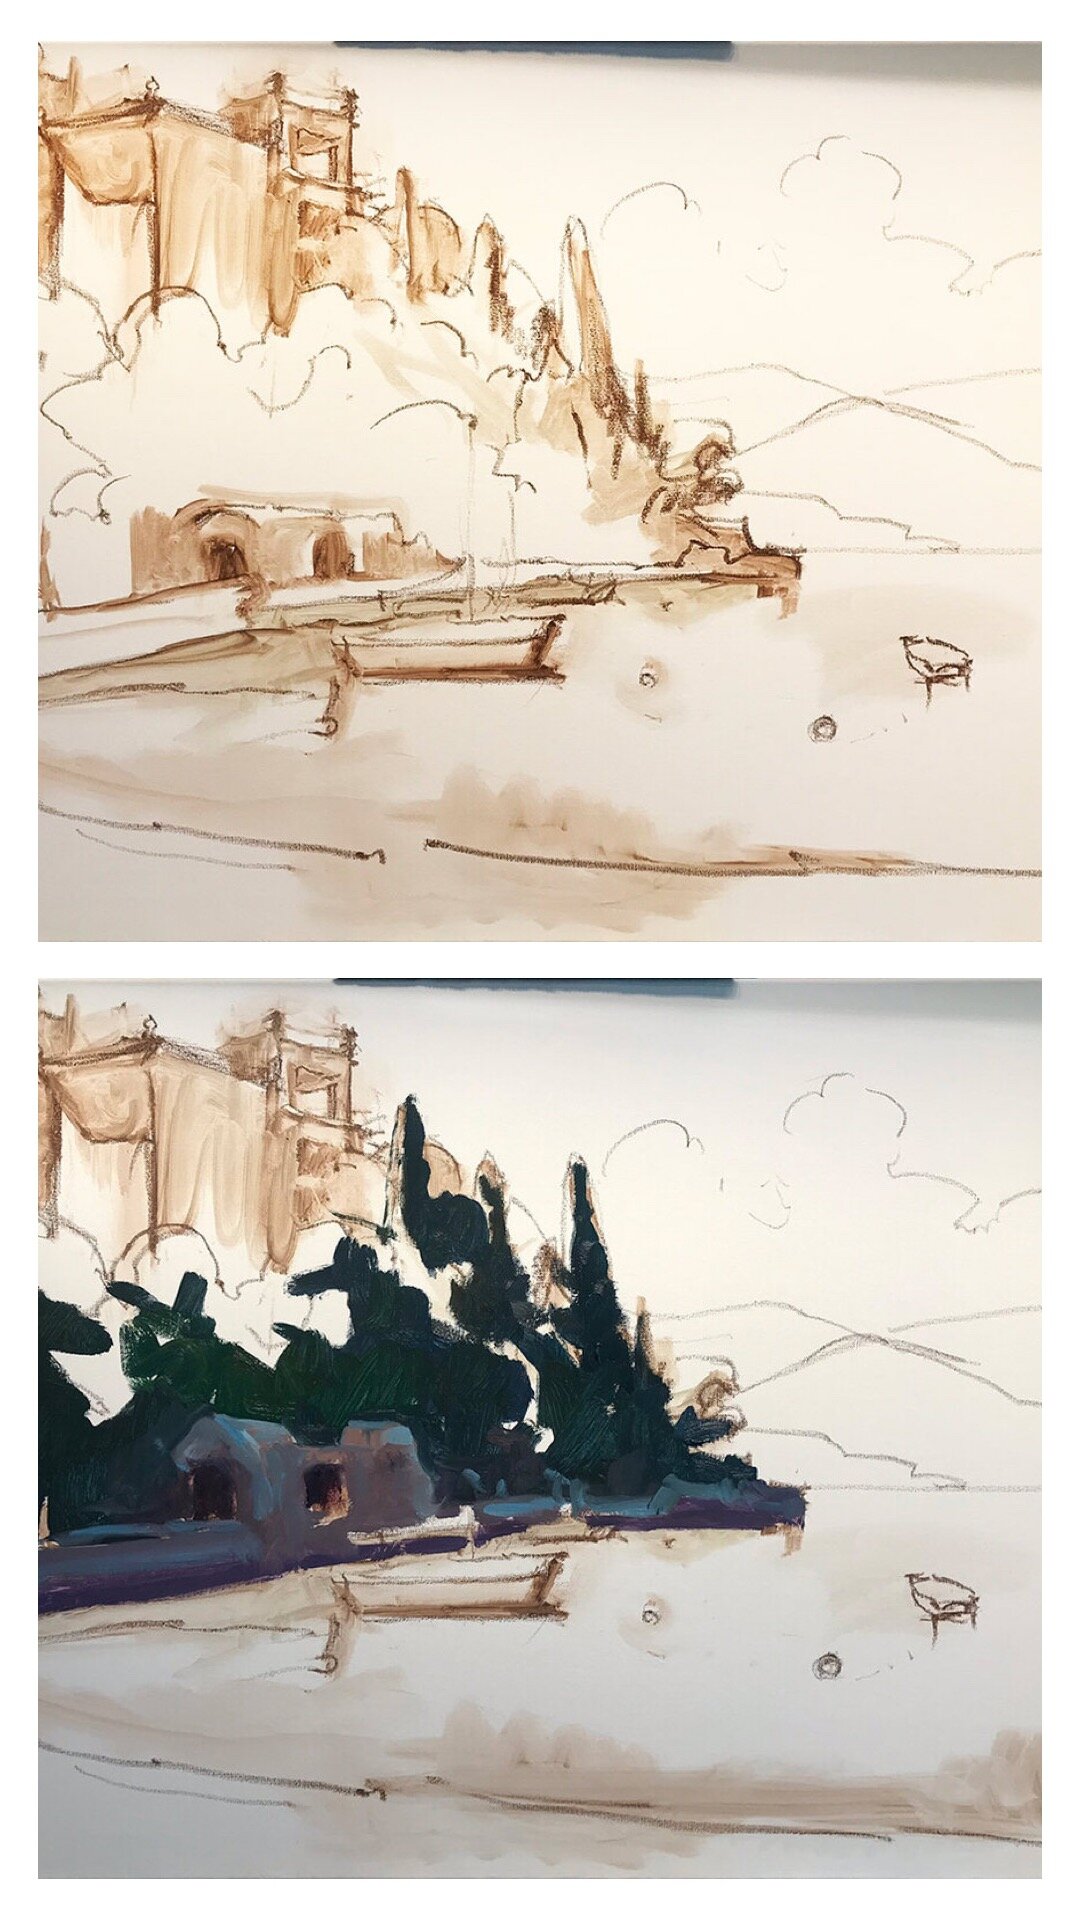
It’s time to address the rest of that white canvas by adding color to the lit side of the trees

varenna_demo_jenniferyoung

I also start addressing a few of the details of the foreground including boats and walkway to the town of Varenna.

varenna_demo_jenniferyoung

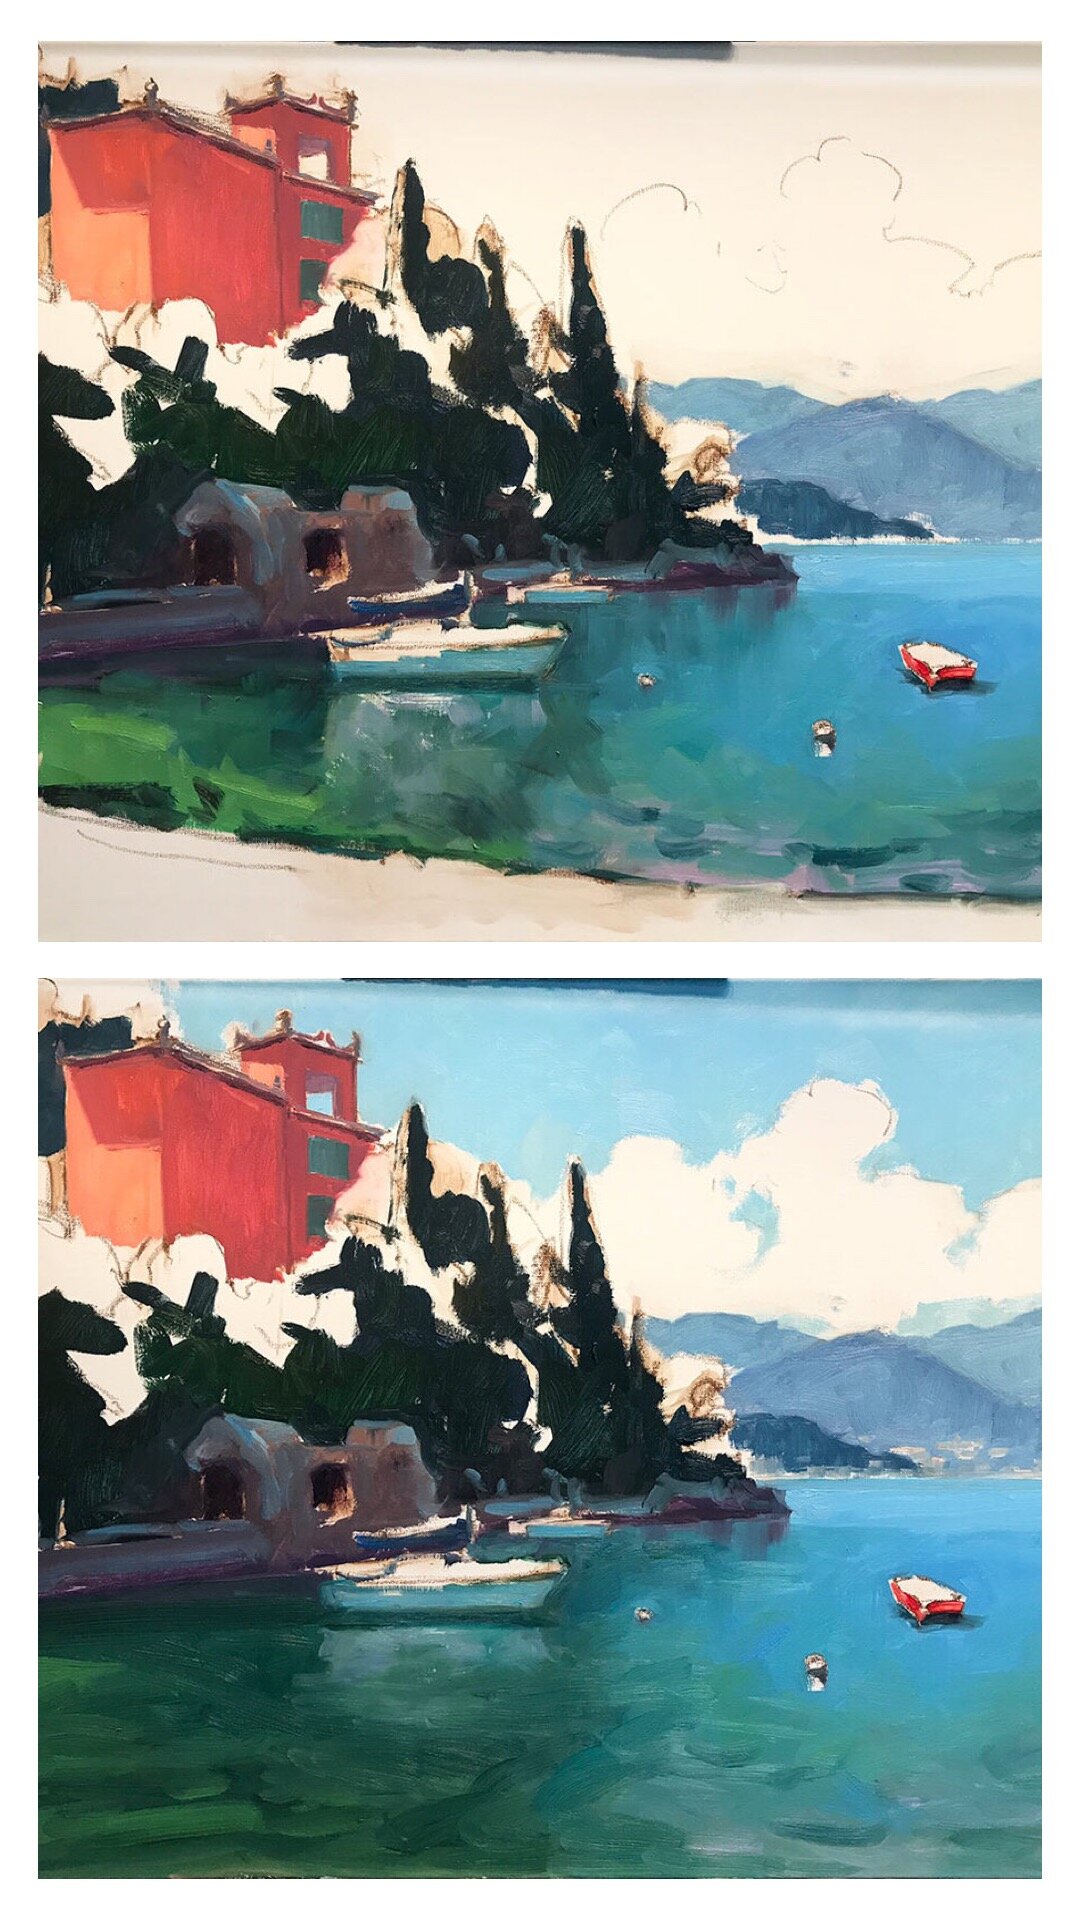
And finally (with a big caveat that this color is off because I was working on the painting at night and photographed it without the benefit of daylight) I start to address the masts, water, and clouds.

varenna8.jpg

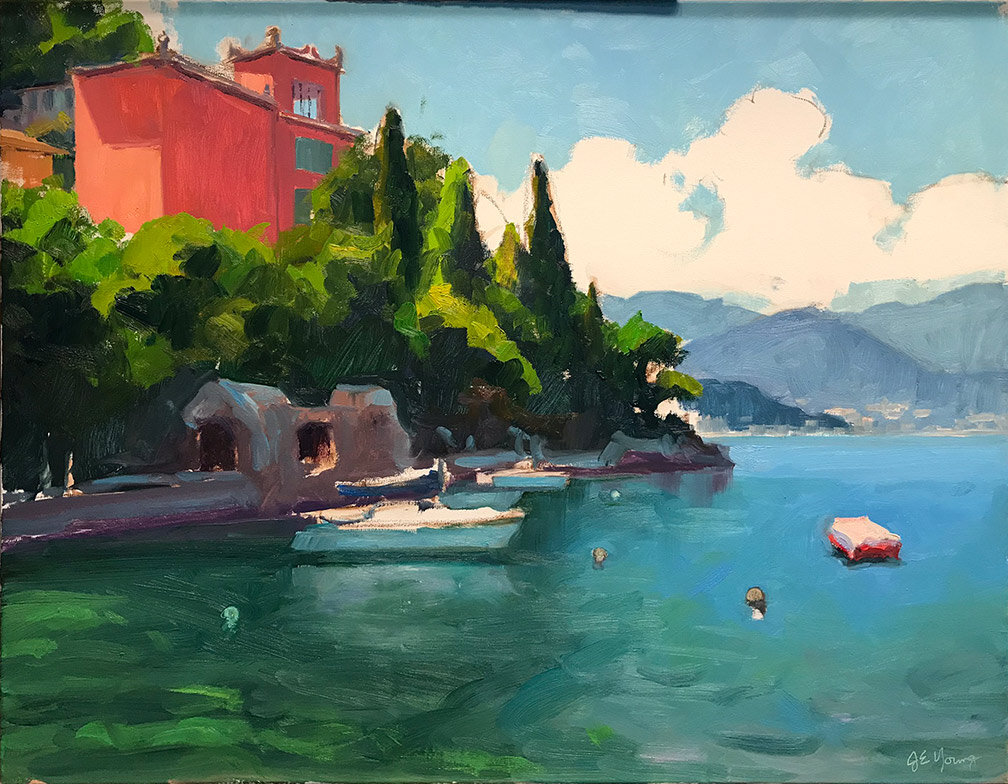
At this point I am going to sit with the painting for a day or two and may “tweak” it here and there, but I am close. I will post the finished piece, (photographed in better lighting) when I do. ***UPDATE*** See the final painting here.

Lake Como painting progression

I am working on putting together a video post, but I have to get my 9 year old to help me with some of the technical side first.😅 So today I am relying on the good old fashioned blog post, sharing a step-by-step painting in progress.

I had such a good time with my last Lake Como Painting that thought I’d “laissez les bons temps roule,” (as the Cajun in me likes to say.) I chose a scene in Varenna from my photo archives, one of my favorite memories that now feels like both yesterday and a long time ago. I chose one of my favorite canvas sizes, a 24x30”, and a color scheme of jewel tones that always cheers me up.

My starting approach for the last year or so is to just very casually sketch out my composition lightly in sienna oil pastel. The Sennlier oil pastel is so soft and lovely that it erases my change of mind with a very low stain, and yet allows me to indicate some shading at the same time.

varennasketch_jenniferyoung

Once I am more or less satisfied with my composition, I begin laying in some of the shadow areas of my painting, to get a feeling for the overall value pattern of my painting.

varenna_WIP_Jenniferyoung

I am generally trying to keep things very broad as I lay down the initial color. While not all of the water is “in shadow”, I decided to lay in the general color because I felt it would help me make a decision about the composition ( as you will see in the next photo.)

Varenna_Painting_Demo_JenniferYoung

My initial idea was to include the foreground shoreline with a couple of rowboats, but at the same time I wanted to keep the distant horizon below the middle point, which pushed the shoreline down. After laying in the water I decided the shoreline wasn’t really doing much for me or the composition.

Varenna_Painting_Demo_JenniferYoung

This is better, I think. Even working from photos in the studio, there is still a lot of decision making that goes into the process. You don’t have to be a slave to a photo and paint something in, just because it’s there in the reference. This is my painting, after all, and sometimes the best thing I can do for my work is to simplify. There may be a future painting with the shoreline boats as the feature, you never know, but sometimes it’s better to say one thing with clarity than several things with confusion.

At this point it was time to step away and make dinner, but I felt like I was at a good stopping point so this is where I left off last evening. I will still need to address the rest of that white canvas and make additional adjustments to the water and boats , but now I have a pretty solid idea of where I’m going next.

A new look and a new painting!

There were times this week when I really doubted that this announcement would come, but I finally have my new website up. Hurray! There were a few glitches along the way (and there still may be some kinks to work out yet) but overall I am pretty happy with the fresh new look.

Speaking of fresh and new, I'll also share a newly finished painting.

"Daytrippers, Lake Como, Cobra Oils on linen,  20x24" ©Jennifer E Young

"Daytrippers, Lake Como, Cobra Oils on linen,  20x24" ©Jennifer E Young

I actually blogged about the start of this piece a while ago but I got to a point where I just had to take it off of the easel for a while and let it marinate. Sometimes the best way to approach a problem is to do something completely different for a while , so that's exactly what I did. When I was ready to return I could look at it with new eyes (albeit bloodshot ones from staying up late trying to get my website up and running) and bring it to a satisfactory conclusion.

A new thing-a-majig and a new painting

In the wake of the plein air weekend I wrote of in my last post, last week was mostly a recovery week for me. I did manage to get a new studio painting started, however. This is the initial tonal sketch on a 20x24" linen canvas.

Tonal sketch

Tonal sketch

This painting  may prove to be a challenge for me because much of this scene is in shadow. But there are a few pops of light that I am arranging in strategic places that I hope will carry the painting. Hey, you never know unless you try, right?

As with the other recent studio oils, I'm working with water miscible paints. One thing I'm noticing with these paints is that the paint blobs on my palette tend to gum up a little quicker once they are laid out, especially when I can't get back to the studio within a day. The manufacturer, Royal Talens recommends in their product info to mist the unused paints with a little water and cover  with foil to keep them moist and reduce the exposure to air. I have never liked putting plastic or foil directly on my paints though, because I feel that it wastes too much in the removal (yes I realize there is a bit of faulty logic in there but we all have our pet peeves).  So I'm experimenting with this:

cakepan_lid.jpg

What you are seeing is a basic 9x13" cake pan covered with a silicone doo-jobby that I found on Amazon. It is supposed to create an airtight seal, and the cake pan is deep enough that this cover-thing doesn't actually touch the paint. Whether it will be sufficient to keep the paint from oxidizing remains to be seen. I haven't been back at the easel since Saturday so I guess I will find out this morning when I go to work. I will report back with my findings, as well as an update on my progress with the painting, in an upcoming post.

Varenna Sparkle

I'm calling this one complete. Maybe a tweak or two to come, but I feel like I have been looking at this painting so intently that I need to take step back from it for a while and start something new.

Varenna Sparkle" Oil on Linen, 20x24" ©Jennifer E Young

Varenna Sparkle" Oil on Linen, 20x24" ©Jennifer E Young

This is a painting of the harbor of Varenna in beautiful Lake Como. It's a theme I have explored a few times now in different compositions. The complement of warm and cool colors really attract me. This one took me a while, but it got me through a number of cold, wintry days filled with bitter wind and ice. Maybe it was a complicated piece, or maybe I just enjoyed all that sparkle and warmth and wanted to linger a bit ;-).