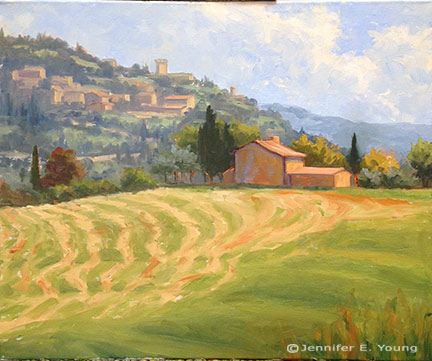
Finally complete- Tuscan Hay painting

I'm taking a break from chopping my vegetables to finally wrap up the latest Tuscany painting I left flapping in the breeze on New Year's Day. After I had my composition established and my canvas covered, it was time to go back in to further develop the background, middle ground, and foreground. It sounds very systematic, but this was really more of a back and forth dance because the value, scale, edges, etc. all have to relate and are interdependent with the other elements in the painting. For instance, in the image below, I thought I had the background fairly finalized...until I took a step back and decided the buildings were too large and too prominent in relation to my foreground house. As I moved forward to the center of interest it became apparent that these two areas of the painting were battling for attention. So I went back and softened the distant village and reduced the size and contrast of the buildings a bit more, and further softened their edges.

Tuscany landscape painting in progress by Jennifer E Young

Here's the final:

"Tuscan Hay" Oil on Linen, 20x24" ©Jennifer E Young

"Tuscan Hay" Oil on Linen, 20x24" ©Jennifer E Young

Progress on the Tuscan Hay painting

As is typical of my working method, I establish my sky and clouds first on my newly sketched canvas. This helps me to key the rest of my light values in the painting. At this point I alsolay in a first pass on the distant mountain.

Tuscany landscape painting in progress by Jennifer E. Young

Next come the hill town and terraced hillside of the background. At this point I am still establishing the compositional elements so there is not much color or value variation. I will go back into these areas again, but I really want to develop the entire canvas to the same level before it sets up too much, as I'm not sure when my next painting session will be.

Tuscany landscape painting in progress by Jennifer E. Young

Now for the middle distance, where my area of interest (the house) resides. I decided to lower the cypress to the right of the house, as I felt there needed to be some height/shape variation in the trees flanking the house.  I'll have to go back into that sky area again where I made this change to clean it up a little more. Good thing I still have plenty of that sky color on my palette! Again, I don't have much in the way of highlights yet...just a few value shifts to give certain objects a little form.

Tuscany landscape painting in progress by Jennifer E. Young

Now I'm ready to start laying in the foreground hill and those groovy hay tracks.

Tuscany landscape painting in progress by Jennifer E. Young

That was fun! Now I have the whole canvas covered more or less to the same level of finish. There's a good deal more to do, but this feels like a pretty good start for around 4 hours of work.

Tuscan Hay

I hope you all had a very Merry Christmas! Ours was filled with laughter and fun, (which is an easy achievement when there is a 3  1/2-year-old in the house). We are still in the middle of winter break, but fortunately I can still carve out a few more painting hours between now and the dawn of a new year. I've been playing around with a composition of the Tuscan landscape of a hillside decorated with the pattern of freshly gathered hay. The meandering pattern of those undulating lines of hay shaped by the rolling hills are what first inspired me to start sketching, first in my notebook, and then more purposefully on my  20x24" canvas:

Tuscany hillside landscape painting in progress by Jennifer E. Young

My plan is actually to create those lines carved out by the harvested hay a lot more subtly, but they are pretty linear right now because I just want to establish their pattern. In the distance is a terraced hillside punctuated by cypresses, as well as  old stone walls and towers, and cypresses so typical of southern Tuscany.

The Potted Garden, Pienza (painting complete)

With school out for the Thanksgiving holiday, my studio time has been a little dicey. But now that we are back in session I have managed to wrap up my posting about the Pienza painting from earlier last week. Before I dive into painting the potted plants, I finish up the main architectural features of the painting-- the final touches on the windows and doors, and completing the distant bench.

 Now let's move onto the flowers!

Here is the final:

"The Potted Garden, Pienza" Oil on panel, 12x12" ©Jennifer Young

"The Potted Garden, Pienza" Oil on panel, 12x12" ©Jennifer Young

The hill town of Pienza is lovely for a number of reasons. First, it overlooks the gorgeous Tuscan valley called the Val d'Orcia. Second, like so many of these small towns,  the whole village is oozing with charm and dripping with flowers, just like the scene I have painted. Third, it is the home of Pecorino cheese! Need I say more?

Shadows, doors and floors

Here is a little progress on my painting of the Tuscan street scene I posted a sketch of in my last entry. Now that I have my design, I am ready to start laying in some color. My palette is fairly expansive, which I tend to do in the studio when I am more pressed for time. Here I'm using a few convenience colors in addition to my basic primary palette of red/yellow/blue. My colors for this piece are Titanium White, Cad Yellow light, Cadmium Red Light and Medium, Alizarin Permanent, Ultramarine Blue, Sevres Blue, (Rembrandt- kind of like Cerulean but a bit brighter with more tinting strength),  Gold Ochre (also Rembrandt brand- like Raw Sienna but warmer and more golden; yum) and Burnt Sienna (tonal sketch only). I start by laying in more concretely the pattern of shadow and light. I really love the way the shadows from the potted flowers spill onto the stone wall and red door:

 I use lots of the Gold Ochre for the wall, mixed with both blues and Alizarin in varying degrees, as the stone has lots of warmth but lots of variation in it too. For the door I started out with pure Cadmium Reds in the sunlit area, but whoa! I then decided to mute this a bit with touches of white and a tiny bit of yellow plus Sevres Blue to give it a more authentic sun-washed look. The door in shadow is a mix of Cad Red Medium, plus Ultramarine and Alizarin.  Next I start to lay in some of stone bench:

As you can see, I use violets in the shadows (Ultramarine Blue and Alizarin, plus touches of  white and yellow) to contrast with the bright warmth of the sunlit stone.

The bench established, I add a little more texture to the stone wall and then begin to lay some pavers. Even though they are terra cotta- colored pavers, they are still very light in value in relation to the wall. I've cooled them off with a bit of  Sevres Blue as they recede, to send them back and lay them down where they belong. Next I'll start working on the potted plants and add some more color to the scene. Stay tuned!