Changing spaces (again)

I mentioned in one of my recent posts that we are in the planning stages with a builder to build a new studio at our new residence. It's coming along-- I'm excited! 😃  But given that we are just in the permit stage, I know enough about building an art studio to know that it will be a while yet before that dream becomes a reality.  Meanwhile, it will be important to save some money to help pay for the new digs. Sooo, I'm giving up my rental space and yet again, moving my studio. 

This time I will attempt to work once more in the house. I feel like we have rearranged our house so many times in the year that we have lived here, that it's comical. So what's one or two times more, in the scheme of things? The room I've cleared out for my little temporary studio has been a catch-all room; a mud room, a temporary guest bedroom, and eventually it will be my office.  It has a door that leads to the back screened porch and faces the site of the future studio. It sits a bit away from the rest of the house, and is just down the hallway from the garage. So in some ways,  the location is ideal for a little painting space.  

What's not ideal though, at ALL, is the lighting. This room is very, very dark, which is why I never thought to use it previously for a home studio. What's changed since we moved to Ashland though,  is the easel light, shown below (installed on my Sorg easel, with an unfinished painting.) 

image.jpg

The light is one by Revelite, which I learned of from seeing postings raving about it in several of my friends' Facebook feeds. Revelite makes traditional picture lights for lighting artwork, but also these work lights designed to work with artist's easels. They are slim profile, adjustable LED bulbs, with a high color rendering (CRI), purportedly, of over 90. 

I purchased the 36" light. I will admit I was sweating bullets when I ordered this thing because while I was "pretty sure" this light would work with my easel, I still harassed Revelite's customer service for a few weeks with a barrage of inquisitive emails.  It was, after all, a very expensive light. And it carried a hefty restocking fee in the event it needed to be returned.  Luckily, though, the light mounted to my easel without an issue, and I am really pleased with the quality of the light it provides to my painting surface. 

image.jpg

Above is my new home-based  temporary studio! Although I still think I need more light for the room, at least I have lit the most important parts of my workspace in order to get the job done.  I've lit the palette area with a standing Ott-lite for now, but as you can see this is a very cold, bluish light compared to the warmer but still very clean easel light (which I prefer.) I am still working on a better solution to this problem, because putting different lighting on my painting and palette will likely be problematic. 

If this little space is looking quite neat, it's because the rest of my supplies (frames, equipment, paintings, etc) are stashed in a million different places throughout my house,  with even more still at the rental space. All of that stuff will need to be moved out and consolidated and organized by the end of August, so aside from painting and splashing in the water with the kiddo, you can guess how I will be spending a good part of the rest of my summer! 

A Venetian Companion

This week I am working out a companion piece to the little Venetian painting I posted the week prior. I often find that small paintings do well in pairs. Certainly a small piece can stand on its own, but it is often nice for the little guy to have someone to talk to. A pair can flank either side of a large mirror or mantle, or stack together on a tall narrow wall:

outerbankspaintings_jenniferyoung

I love grouping paintings, and while it doesn't work for every piece, I have started to try and think in terms of finding a  buddy for my little friends when it's possible. This is the start for our little Venetian companion:

venetiansepiasketch_jenniferyoung

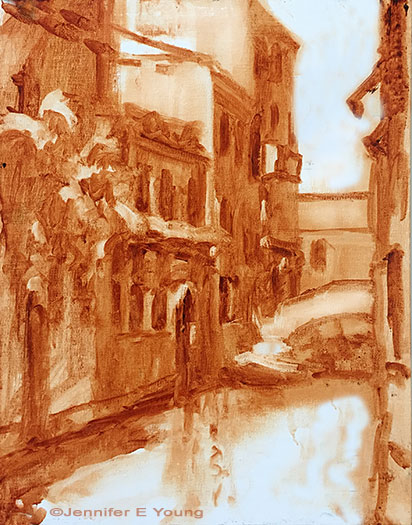
A rough lay-in in burnt sienna gives a first pass at my light and shadow family. When I start to add color, I will keep those two families in mind. First up is the shadow family:

venicepainting_wip_jenniferyoung

You can see that even some of the "white" colors (around the door frames, etc, are still in shadow and will therefore generally be a darker value than anything in the light family. The eye can really trick you once you bring color into the picture, so it is something to be aware of at all times! More to come! Stay tuned.... 

La Barchetta Rossa

I had such fun with this little painting that I am thinking of doing it again as a larger piece. My goal in the execution was to keep it loose and not get bogged down in too many details that can happen so often when approaching architectural scenes; especially when working from photo references. 

"La Barchetta Rossa", Oil on linen, 12x9", ©Jennifer Young

"La Barchetta Rossa", Oil on linen, 12x9", ©Jennifer Young

As with plein air painting, sometimes giving yourself a handicap can be very helpful. Squinting, for instance, allows one to reduce visual information down to shapes, patterns, and values. These days taking off my glasses serves a similar purpose (*SIGH*). Another method that I experimented  with here was to "blur it up"  using one of the artistic filters in Photoshop. This has the effect of removing the detail while still providing the shapes and values. I used my blurry image for most of the painting, and then referenced the detailed photo at the end to see what I may have missed and add the finishing touches. What was interesting is that I liked the freshness of my initial round so much that I found very little I wanted to add or adjust once I referenced the detailed photo. I have often used Photoshop to adjust shadows and highlights in my photo references, or to crop for ideas on composition, but this was the first time I have used it to remove detail. I really liked this method and will likely do it again, especially for complicated scenes like architecture where it can really be helpful to turn down the visual "noise".

A new look and a new painting!

There were times this week when I really doubted that this announcement would come, but I finally have my new website up. Hurray! There were a few glitches along the way (and there still may be some kinks to work out yet) but overall I am pretty happy with the fresh new look.

Speaking of fresh and new, I'll also share a newly finished painting.

"Daytrippers, Lake Como, Cobra Oils on linen,  20x24" ©Jennifer E Young

"Daytrippers, Lake Como, Cobra Oils on linen,  20x24" ©Jennifer E Young

I actually blogged about the start of this piece a while ago but I got to a point where I just had to take it off of the easel for a while and let it marinate. Sometimes the best way to approach a problem is to do something completely different for a while , so that's exactly what I did. When I was ready to return I could look at it with new eyes (albeit bloodshot ones from staying up late trying to get my website up and running) and bring it to a satisfactory conclusion.

A new thing-a-majig and a new painting

In the wake of the plein air weekend I wrote of in my last post, last week was mostly a recovery week for me. I did manage to get a new studio painting started, however. This is the initial tonal sketch on a 20x24" linen canvas.

Tonal sketch

Tonal sketch

This painting  may prove to be a challenge for me because much of this scene is in shadow. But there are a few pops of light that I am arranging in strategic places that I hope will carry the painting. Hey, you never know unless you try, right?

As with the other recent studio oils, I'm working with water miscible paints. One thing I'm noticing with these paints is that the paint blobs on my palette tend to gum up a little quicker once they are laid out, especially when I can't get back to the studio within a day. The manufacturer, Royal Talens recommends in their product info to mist the unused paints with a little water and cover  with foil to keep them moist and reduce the exposure to air. I have never liked putting plastic or foil directly on my paints though, because I feel that it wastes too much in the removal (yes I realize there is a bit of faulty logic in there but we all have our pet peeves).  So I'm experimenting with this:

cakepan_lid.jpg

What you are seeing is a basic 9x13" cake pan covered with a silicone doo-jobby that I found on Amazon. It is supposed to create an airtight seal, and the cake pan is deep enough that this cover-thing doesn't actually touch the paint. Whether it will be sufficient to keep the paint from oxidizing remains to be seen. I haven't been back at the easel since Saturday so I guess I will find out this morning when I go to work. I will report back with my findings, as well as an update on my progress with the painting, in an upcoming post.