Bellagio from above; more oil painting w/out solvents

Following up from my prior WIP, here is the final painting. This is a view of Bellagio from a hike we took up to Villa Serbelloni. The villa is now maintained by the Rockefeller Foundation, who uses it as a retreat for  the Bellagio Study and Conference Center for artists and writers (wouldn't that be nice?) For this reason, we couldn't go inside the villa when we visited, but we could tour the grounds, which offers gorgeous views over Bellagio.

"Bellagio From Above" Oil on Linen, 20x16" ©Jennifer Young

"Bellagio From Above" Oil on Linen, 20x16" ©Jennifer Young

Both this piece and my previous Lake Como painting, were done without the use of solvents or any other medium other than small amounts of walnut oil to clean brushes and thin paint when necessary. But even when used judiciously, the walnut oil served to slow drying considerably. At present this is not a huge problem, as I am spending most of my time painting/renovating/preparing home and life for the new baby! But it does change the nature of things and the overall result became more impressionistic due both to the behavior of the paint, and probably also the gaps in my working sessions.

I know that an oil painting requires a certain length of time for all of the layers to fully dry (sometimes as much as 6 months or a year.) But normally the top layers will dry to the touch in about a week's time.  Not so with the walnut oil method, which seems to require at least an additional week to my usual handling time.

Maybe it's just that my painting habits are not particularly suited for this method, or maybe I just need to get used to new ways of doing things. Overall, except at the very beginning stage, I don't paint in thin layers. In fact, while I don't lay it on with a palette knife, I do paint passages that are relatively thick and juicy. But oddly, I experience the most difficulty in the lay-in, (early stage) which I am used to having set up rather quickly.

First of all, in order to follow the "fat over lean" rule, I have been trying not to make the paint too "fat", too soon. So I keep the walnut oil I use in my initial lay-in stage very spare. The result is that instead of a thinly painted initial sketch and color block-in, I find myself with trying to move paint around that has a definite drag and is less fluid. The lay-in becomes more often a "rub-in" with a rag or a "scrub-in" with an old brush, and the edits and corrections are very hard to lift off the canvas.

On the other hand, if I use more walnut oil at this stage, the paint can get too smeary and unmanageable for successive layers, not to mention less stable (with any medium you use, you should only use no more than 20% total volume when mixed directly into the paint, and I usually err on the side of caution and use rather less than that.)

One solution may be to use a runnier paint in the lay-in stage. M. Graham walnut oil paints are such a paint. I do have a few tubes on hand, as I've tried them in the past. As much as I wanted to like them, I normally prefer more body to my paints. But they might just work for my purposes now--but still probably just in the initial stage only. (Incidentally, it's perfectly okay to mix walnut oil with linseed oil based paint, so even if you want to paint solvent-free, you do not need to buy their paints exclusively.)

Aside from walnut oil to thin,  there are other oils to try. Linseed oil is commonly used by artists, both in mixtures of ground paint and in various mediums. And while both linseed and walnut oils are considered to be "drying oils", linseed tends to be the faster-drying of the two.  However, I seem to read a lot about how linseed oil tends to yellow over time. Maybe this is an exaggerated worry, but a quick look at experiments like this one swayed me to first try the walnut oil over linseed.

So, to sum up from this layperson's perspective, some of the pros of using walnut oil to thin/clean are:

  • Non-yellowing
  • Non-toxic/ solvent-free painting (though other oils can also serve to achieve the same thing.)
  • Odorless
  • Does not evaporate like solvents, so it seems fairly long-lasting
  • Conditions brushes nicely

Cons:

  • Walnut oil is expensive! (If you are only using oil to clean your brushes, you could probably get by with a less expensive oil.)
  • Slows drying considerably (this could actually be a "pro", depending on your painting technique.)
  • Compared to solvent, it requires using more brushes and/or more wiping of brushes between colors in order to keep the color clean.
  • Walnut oil is expensive!

A WIP and oil painting without solvents

After a couple of wipers, I finally have at least a work-in-progress to post. I've continued with the Bellagio theme, this time with an ariel view. I guess I'd call this a color block-in:

bellagio painting work in progress

Why the wipers? Well, I've been oil painting without solvents, and it's taking some practice to get the hang of things. Now as a fairly long-time an oil painter, I'm quite used to being around solvents. I do try to be conscientious of the risks and precautions, so I minimize odor (through ventilation and the use of a high quality OMS) and contact (wearing nitrile gloves) when handling my paints. But otherwise I admit I haven't thought too much about what potential hazards might be involved.

I guess I've been fortunate, in that I haven't experienced some of the allergies that other artists have suffered. But allergies or not, now that I am in the midst of  pregnancy, taking the utmost care in the studio has taken on a new significance. So I decided to do a little investigating....

* Warning, this post is rather long...it's the first in a series of postings about what I've learned on alternatives to my usual oil painting method, presented in my usual rather rambling way. It's certainly not the definitive source on the topic, but may hopefully provide some insight or a jumping off point for other painters who may be wondering about some of this stuff.

Pigments

When considering alternatives to my usual method of painting, I first took a look at the  pigments I was using, simply because they are essentially the same substance found in oils, watercolors, acrylics, casein, etc.  Pigments are the ground powder, either natural or synthetic, that comprises the "colored part" of the paint.

From what I can gather, due to the risk of inhalation, pigments seem to be most hazardous when in their ground, dry form. Some folks using manufactured paints from the tube are rather indifferent in their attitude about pigments in paints, saying, "Well, as long as you don't snort or eat your paints you'll be fine."  Nevertheless, some pigments do contain toxins and heavy metals, which could potentially be ingested or absorbed through the skin on surface contact. So for this reason it's always a good idea to wear gloves when handling them, and avoid eating, smoking, etc., around them, at least not without thoroughly scrubbing with soap before hand.

I put the question of hazards in manufactured artist oils to the maker of the oil paints I use most frequently- Winsor Newton. The technician, Amy Faris, was extremely helpful and very quickly responsive to my queries. Here's an excerpt of some of what she wrote about pigments:

"Depending on the color, our oil paints contain either linseed oil or safflower oil, with the possible addition of a drier, again depending on the color.  Other than than, I am unable to give you any specific recipes regarding the oils, because that information falls under the category of proprietary, and they won't even share it with me." (*Jen's note: this last sentence is one I heard over and over from the manufacturers of artist's materials that I queried directly.)"

"What I can tell you is that all of our products are tested and labeled for health and safety by an independent toxicologist at the Art and Creative Materials Institute (ACMI).  An AP label - or a non-toxic label signifies that the toxicologist has not found anything in the product that can cause you harm, as long as you are using the product in the manner for which it was created - in other words, you are not eating it, applying it to your friend's body, etc.  A CL warning label signifies that the toxicologist has found something in the product that can potentially cause harm.  This CL label is usually followed by a statement on how to use the product safely."

"All health labeling can be found right on the back of every tube of paint we manufacture and on every container of medium, solvent etc.  If you would like more information on the toxicologist or on health and safety in general, please visit the ACMI website at:  http://www.acminet.org/"

"In terms of pigments:  some mineral or metallic based pigments can be hazardous to your health if they build up in your system over time. Lead, cadmium,cobalt  and chromium are some problematic pigments that spring to mind. Generally, the biggest hazard comes in to play if you are working with these pigments in their dry, powder form and are breathing the pigment dust into your lungs.  In terms of the pigment while it is contained in a vehicle (contained in the paint form we are all used to working with) as long as you are not spraying the paint (cadmiums breathed into the lungs prove to be cancer-causing), or ingesting it in large quantities over time ( I sometimes joke about eating it, but if you point your brush in your mouth or eat or drink in the studio with paint covered hands you run the risk of ingesting the paint)  you should be okay.  Paint that contains lead (usually whites such as flake or cremnitz white)  needs to be handled with great care - the lead can be carried through your skin layer if the paint has been diluted with a thinner - you never want to clean your brushes by rubbing them in the palm of your hand - doing so can drive pigments directly into your skin.  Cobalt can be a skin irritant to some people."

...And the vehicles?

So basically, since I don't grind my own paints, I can take care in handling and just make note of the labels (and manufacturers that use such labeling) to make my choice of paint. But what about the vehicles used to suspend the pigment in the paints and give them their characteristics? In many cases it is nothing more than a seed or nut oil (linseed oil, walnut, poppy, etc.) But in other cases, there are other additives, and they seem to be both more mysterious and potentially more hazardous to me (and my unborn baby) since they can be inhaled as they float about in the air. Paint manufacturers are, as I said, pretty hush-hush about the specific additives used in their formulas.  As artists, even with the labeling, it's often difficult to impossible to derive specific information on which elements beyond the pigments in the paint are potentially toxic. But through a very cursory look around the web, I learned that  some of the potential additives to common artist paints (oils, acrylics, etc.) could be various solvents and resins that are volatile organic compounds (toxic inhalants), formaldehyde, preservatives, and mercury. Yikes!

And contrary to popular belief, in terms of tubes of paint, it doesn't seem to me that oil paints are necessarily any more toxic than say, acrylics. In fact, while acrylics clean up with water, many acrylics use vehicles that contain ammonia and formaldehyde that off-gas as they dry.

So, being at best a dabbler in watercolors, not having enjoyed my past experience with water soluble oils, and seeing no compelling reason to jump over to acrylics, it looked like oil painting without solvents was still worth pursuing for me. It would require some changes in my work habits, but if I could use precautions and avoid both the use of solvents to clean my brushes, as well as solvents, driers, and other potentially noxious fumes that come from various painting mediums , it could be done.

And that has been my aim. The W.I.P. pictured above, as well as and the one from my prior post were both done without the use of solvents. I'm using my usual paint brands--just using walnut oil instead of OMS to clean my brushes and a very tiny bit to thin my paint if needed. But it's slow going. This old dog is still having some trouble with her new tricks, and it's taking some getting used to. I'll write more about those challenges in a future post.

French market painting #2

Here is something of a companion piece to the other Cahors market painting I posted a couple of days ago:

"Legumes du Jour" Oil on Linen, 20x16" (SOLD) ©Jennifer Young

"Legumes du Jour" Oil on Linen, 20x16" (SOLD) ©Jennifer Young

For both this painting and the previous market painting I have again experimented with a single primary palette of just 3 colors (red, yellow, and blue) plus white. I don't normally use a huge palette any way, but sometimes I feel I can become over-reliant on certain colors. Using a very limited palette helps me to feel as if I am taking back in control of my color mixing and really forces me to think more about color relationships. It also pretty much ensures more unified color. My three primaries for these two paintings were cadmium yellow pale, cadmium red medium, and ultramarine blue, and the white was titanium.

"The Brook"- A plein air adventure in Bryan Park

Last week I took another early morning stab at painting in Bryan Park. Since I had already done a couple of plein air paintings at the park of Young's Pond, (which you can see here and here) I decided this time to tackle the shady brook that feeds it:

"The Brook" Oil on birch panel, 12x9" ©Jennifer Young

"The Brook" Oil on birch panel, 12x9" ©Jennifer Young

Even though everything seemed to be lining up for me when I launched into this painting, I did have a couple of unanticipated challenges. At the time I was dealing with "umbrella issues", so after hassling with it for about 10 minutes to no avail, I gave up and just tried to position myself so that my painting and palette would be shaded from the sun. Sometimes it's hard to anticipate this, but I keep a compass handy for that reason, and I figured I would have at least an hour before the sun would overtake me.

But then there was "Billy" (not his real name.) Let me preface by saying that Billy was an incredibly kind and gentle soul, and exceedingly complimentary. But Billy liked to chat. A lot. And ask lots of questions. I love meeting people, and I am always blown away by how lovely people are when I'm out painting, complimenting my work as they stop briefly to take a look. But I find it pretty much impossible to chat for extended periods and stay "in the zone" when I am painting.

At the same time,  I have yet to figure out how to express this to someone without feeling like I am being a big jerk. My husband's advice is matter-of-fact- "Tell them you are W-O-R-K-I-N-G." This seems so simple and rational until I am in a real life situation. I guess I just hate to be rude, and it feels so ungracious when someone is being so genuinely enthusiastic. But really, Dave's right. This is my work, and it's up to me to respect it and value my time, regardless of whether any one else thinks to do so.

As it was, I was a total wimp and did not tell him anything close to that--at most, merely *hinting* that, "Well, ahem! I'd better get to this thing and focus, ha-ha!" (which apparently was a bit too subtle for dear Bill). The end result was that it took me far longer than I wanted to take, and all too quickly I lost my beautiful shade.

When I got back to the studio, I had the inevitable but still unpleasant surprise of seeing a resulting painting far darker than I thought it was when I was on site, due to the sun's glare (what I call "retina burn"). I did about 20 minutes of rework from memory to lighten it up in places, and I think I've still managed to maintain the feeling of the light and the place.

The odd thing is that even though I seem more often than not to have to deal with the pitfalls (and pratfalls) of painting on location, there is still something about it that leaves some part of me feeling exhilarated. There's a clarity to it; a feeling of losing myself and being in fully the moment, even alongside the sunburn and bugs and chatterboxes. So I'll return. And hopefully next time I do so it will be with a working umbrella AND a backbone!  ;-)

More alla prima portraits

Following up on my previous post about the Rob Liberace's portrait workshop, I thought I'd start this entry by posting my painting from day 2 of the class. This was a very different model from the one who sat for us on the first day:

thecaptainstudy_jenniferyoung

Portrait study- "The Captain", Oil, 20x16"

I heard quite a few people calling this gentleman the Captain, but I'm not sure if they were doing so because he actually was a captain, or just looked like one! In any event, he was a riot and really seemed to get a kick out of sitting for us. He was an excellent model, able to stay still for an extraordinary amount of time (which he attributed to the fact that he was a long-time turkey hunter.)

I got a little further along with this portrait than I had done on the first day, though I think I had a bit of a handicap to overcome. I had toned this canvas rather too dark. Prior to the class we were sent instructions to tone our canvases in acrylic to a middle value gray. I'm ususally pretty good with my value judgements, but I'd not used acrylics in a long time and they seemed to dry darker than I had expected them to.

This ground had me feeling like I had to do a good deal of extra work to get rid of it so that I could acheive the fair complexion and hair of this gentleman. Normally the middle value gray would be a nice gauge  for judging mid tones, but with this model's coloration especially, the darker than mid gray tone was just not helpful.

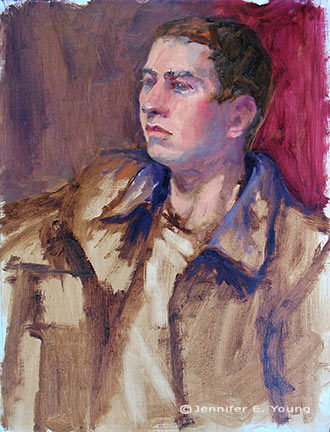
This next portrait below was actually not done in the workshop, but comes from a session last week after I returned back home. I met up with a local portrait group that meets weekly here in Richmond. I have actually wanted to meet up with this group for quite a while but for some reason the mid-week evening sessions have not jived with my schedule. Any way, this is Joey:

"Joey" (portrait study), 16x12, oil on linen

"Joey" (portrait study), 16x12, oil on linen

Since I knew we'd only have this model for a 3 hour segment of time, I thought I'd make it a little easier on myself by choosing a smaller canvas (toned in a light wash of burnt umber, on the spot). As it turned out, I didn't get much farther with my level of finish; which is too bad because Joey had on a great oversized black leather jacket and was holding a guitar.

Nevertheless, I think this is my favorite alla prima portrait so far, as I was very happy with the likeness I was able to achieve. I went about it in the same manner as the two previous studies, using same palette as I'd used in the portrait workshop. But this one just seemed to "click" a little better. Even though that electric blue could use some toning down around his jawline, I like what's happening with the color sense and the brushwork.

I'm missing the portrait group's meeting this week because I'm going to the Shins concert (woo hoo!) but I intend to keep up with them on as regular a basis as I am able. Whether or not I ever "do anything" formally with portraiture, I've made it my goal because I'm convinced that the challenge of working from the live model will improve my abilities to render and to see light and color more accurately overall.